From Scratch to Delightful - Building a Static Website with HTML and Azure

This guide outlines the process of building a static website using HTML. It demonstrates basic HTML features and the static website hosting option on Azure storage, including HTTPS and custom domain name configuration.
The project is inspired by this Odin assignment which is the first among many on The Odin Project - a website providing a collection of web development training resources.
The GitHub repository for this project is available here. The final website can be viewed at https://delightful-recipes.try-and-trash.com.
Selecting the Name
The project name also serves as the GitHub repository name and the domain name. It may also be used for other resources. Renaming these resources is complex, as such it is important to select an appropriate name from the start. Currently, the website consists of four HTML pages and three JPG images, but it will grow in the future.
Here are the candidate names:
- odin-recipes: This name is the one that the Odin assignment recommends. However, it permanently ties the project to the original assignment, which may become undesirable as the project grows.
- recipes: This name is too general, and so it will clash with other recipes-related project names.
- delightful-recipes: This name is perfectly vague to be associable with any kind of recipe. Additionally, other recipes-related projects can take on their own vague descriptors to avoid name clashes.
Commit-by-commit Implementation
This section details the project implementation on a commit-by-commit basis.
Step 1: Source Folder and Landing Page
The first commit initiates the project and sets up the landing page.
This project organises all source files into a single folder named "source" instead of keeping them in the root folder. This approach simplifies project deployment. One can directly point to the "source" folder and deploy everything in it while the files at the root level such as ".git", ".gitignore", and "README.md" get automatically excluded.
A landing page is the web page presented to users when they first visit the website. It is a convention to use "index.html" as the landing page filename.
At this stage, the "index.html" file can be opened in a browser. Currently, the page contains only a heading and a title.
Step 2: Recipe Pages
The second commit sets up the recipe pages and two-way links between the recipes and the main page.
HTML defines links using the anchor element <a>. The link destination, known as the "hypertext reference," is specified by the "href" attribute of the anchor element. Links go one way: from the page where they are defined to the specified destination. To set up a two-way connection, both the recipe page and the main page define links pointing to each other.
At this stage, one can use a browser to navigate between the recipes list and to any individual recipe page and back.
Step 3: Structure
The third commit organises each recipe page into a list of lists. The main components are Preparation steps, Ingredients, and Equipment, all of which are cooking-related terms. Preparation steps is a list of actions describing how to make the dish. Ingredients are the components that go into the dish. Equipment refers to the items used during preparation but do not go into the dish.
Step 4: Content Generation
Once the structure is established, it can be filled with content. The commits for the three recipes are: Fresh Fruits Dessert, Tuna Sandwich, and Hard-boiled Eggs.
Step 5: Images
The next commit adds images to the project. Adding images involves two steps. First, the image itself is added to the project. In this case, images reside in the "images" folder. Second, a link to the image is created using the HTML <img> element. The "src" attribute (meaning "source") specifies the path to the image. The "alt" attribute (meaning "alternate text") provides textual description for the image in case the image is not displayed.
Hosting
The Delightful Recipes website is implemented and viewable on the local computer. The next step is to make it accessible on the web.
One hosting option among many is static website hosting in Azure storage. Tutorials are available here and here. This approach involves provisioning an Azure storage account and uploading the website files. Additionally, it uses Azure CDN to enable a custom domain name and HTTPS.
Step 1: Associating a Domain with an Azure CDN Endpoint
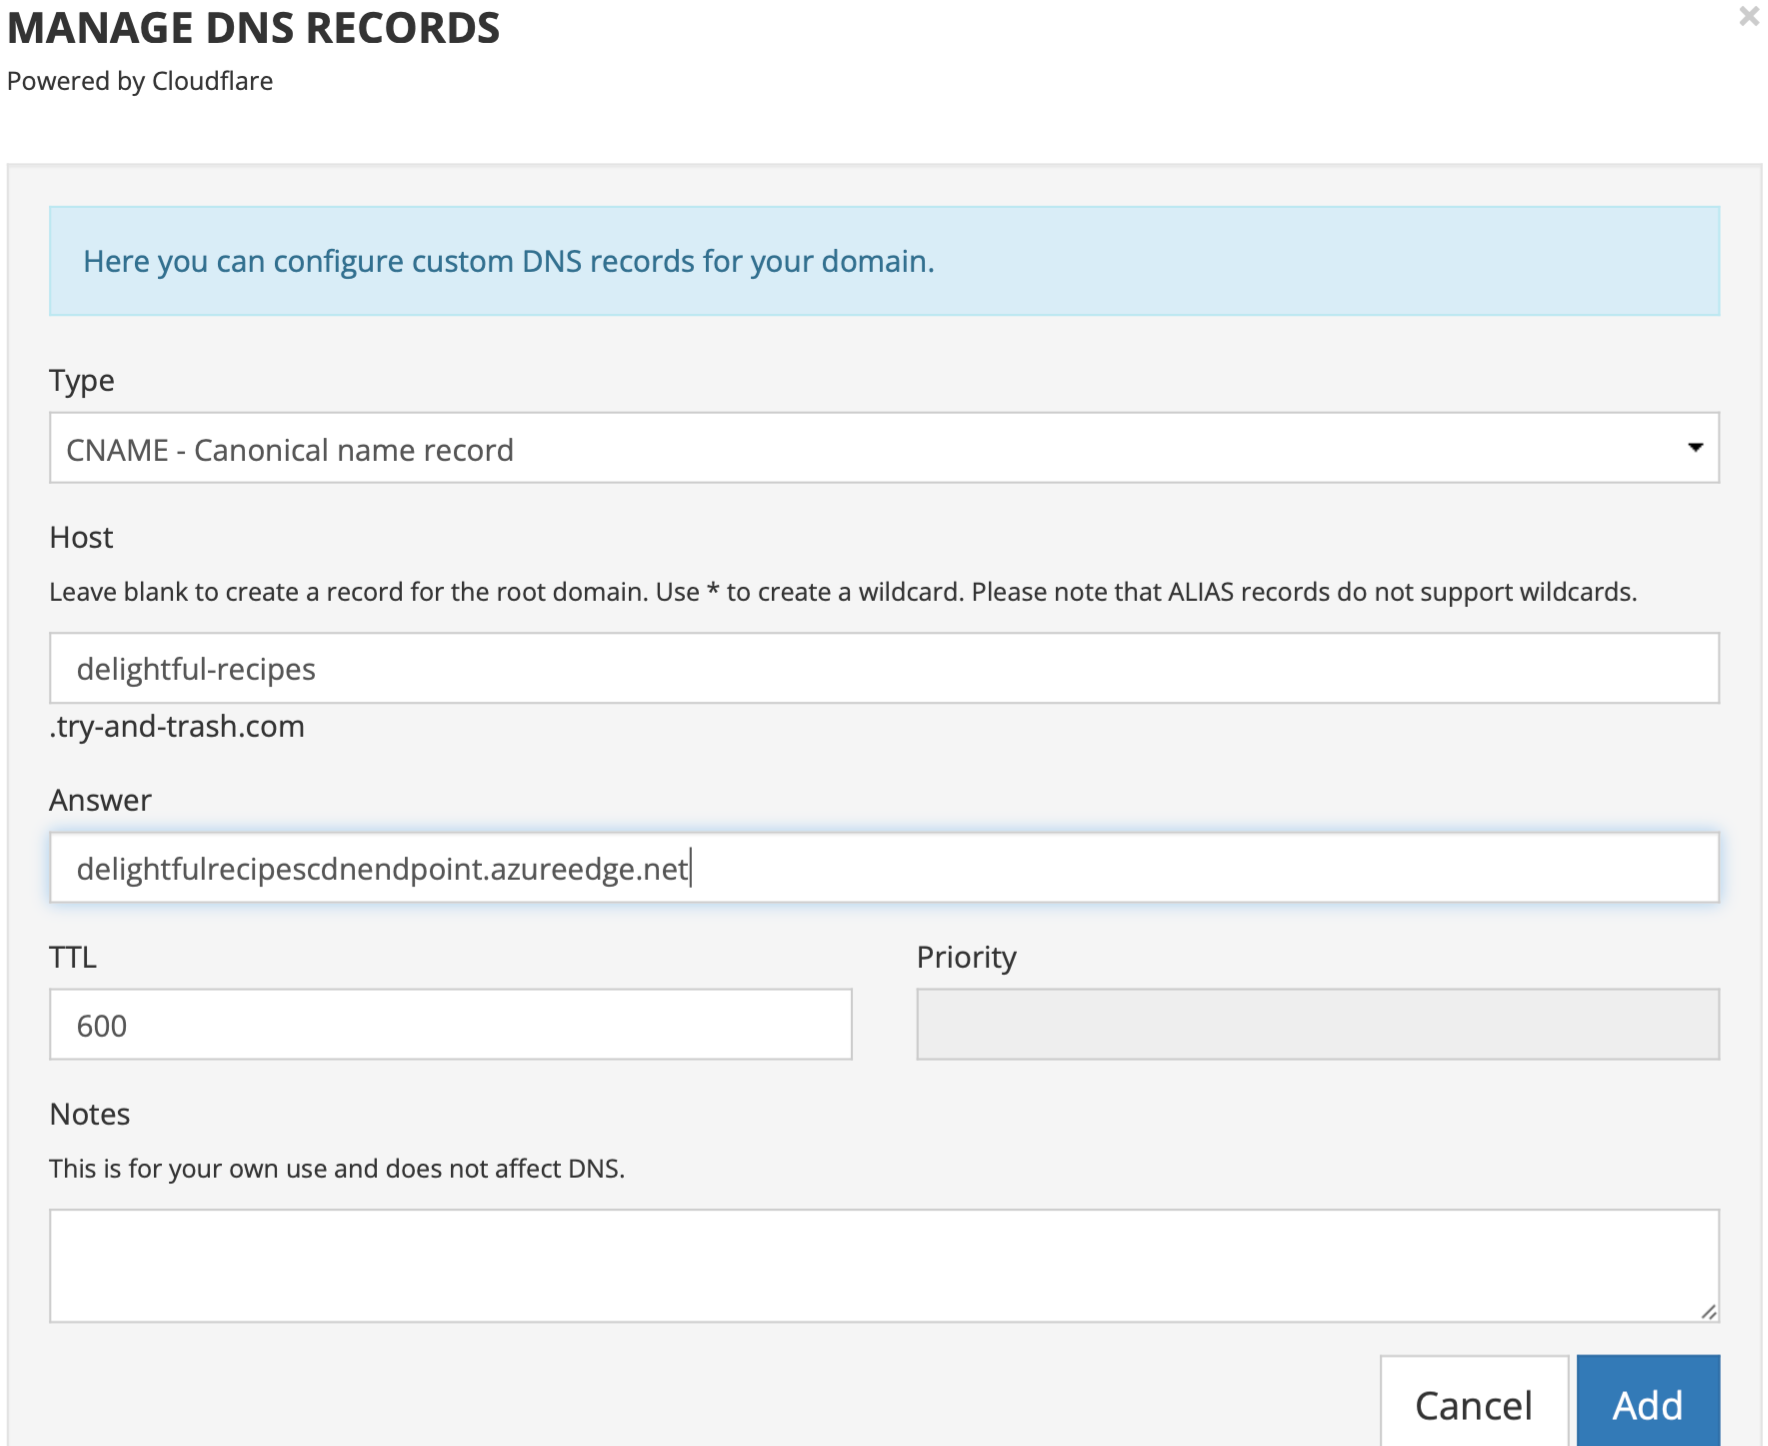
An Azure Content Delivery Network (CDN) endpoint can be configured to use a custom domain. To achieve this, a canonical name (CNAME) record must first be created with the domain provider. The CNAME record maps a source domain name to a destination domain name.
For example, as of May 2024, the Porkbun interface for mapping the "delightful-recipes" subdomain to an Azure endpoint named "delightfulrecipescdnendpoint.azureedge.net" appears as follows:
Step 2: Provisioning Resources
This commit sets up a shell script that uses Azure CLI to provision and configure all necessary resources. It assumes that the Azure CLI is installed and the user is logged in. The script requires subscription name and location parameters.
The script can be executed from the command line at the project root level as:
sh setup_azure.sh "subscriptionname" "location"
The script may take 5 or more minutes to run. Once the script has finished executing, it may take another 15 minutes for HTTPS to be enabled, although Azure advises here that it could take a few hours. The HTTPS provisioning state can be checked with the following command:
az cdn custom-domain show  \
    --resource-group $RESOURCE_GROUP_NAME \
    --profile-name $CDN_PROFILE_NAME \
    --endpoint-name $CDN_ENDPOINT_NAME \
    --name $CUSTOM_DOMAIN_NAME \
    --query "customHttpsProvisioningState"
If anything goes wrong, the resources can be deleted by first removing the CNAME record and then deleting the resource group using:
az group delete --name $RESOURCE_GROUP_NAME
Conclusion
This blog post has outlined the process of creating a static website using HTML and hosting it on Azure. The resulting website serves as a starting point for further enhancements.
Revision questions:
